
Tutorials
What is Flutter? Ultimate Guide to Flutter

In this lesson, we are going to go over exactly “what is flutter” and its purpose. Let’s start by explaining with an example.
Kyle is one of my friends. He tried hard to make a living for himself out of his programming knowledge, and he was quite lucky he had a small app idea, and he decided to go for it. He made a beautiful android app. Everybody loves it. It has only been a few weeks, but Kyle hit a stroke of luck and got 15 000 downloads already. The app has gained traction, and most of the reviews are quite positive. It sounds amazing, I know, but you see, nothing ever is perfect.
Kyle forgot the most important part of making an app. He did not prioritize figuring out how to monetize his app; you know, a huge mistake. Now he’s only earning about five cents per user every three months, which is just terrible, and he decides that he needs more users.
It just so happens that many people ask for the IOS version of the app a lot. That sounds like the perfect solution. Well, it is, but it’s also a huge problem. Why? Well, you see, now Kyle has to learn everything about IOS development, and that takes a while to properly master even for Kyle, who is an experienced programmer.

After all, he has to create a new app that works at least as well as the android version because if it’s worse, nobody will want it. Everybody will hate Kyle. Anyway, fast forward a few months and Kyle did it. After months of hard work, he published his newest creation to the app store and was ready to take in all new app users and make more sweet money.
However, Kyle realizes that he is in deep trouble because he has to do it for both platforms every time he has to make any changes to the app and maintain two different codebases, which is seriously a lot of work.
Now Kyle will have to quit his part-time job to support his app full-time, but that’s not all the potential issues. He put himself into it, and he ended up making a better app for IOS than he did for Android. The biggest challenge in creating apps for Android is to allow for different screen sizes. It will drive you insane, and if you don’t do a perfect job, the users will let you know.
By now, you probably know where we’re going with this; what’s the solution for all these problems? That’s right. Flutter is a toolkit that helps you achieve beautiful interfaces for all sorts of screen sizes and devices. There are screens everywhere, so why can’t there be something that can intelligently design beautiful interfaces for all screen types. Flutter is what gets that done.

Not only that, it makes it much easier and simpler. It borrows some concepts from web design that have always adapted to several different aspect ratios.
Flutter uses layout widgets to make your life easier. If used properly, these layout widgets will make sure your apps behave correctly in any kind of screen size, which is just major. It asks for a white window on a device then it will draw onto that window. Whatever was programmed, and it will adapt it to the screen every single time. Instead of creating apps, the Android, or the IOS way, you can make the flutter way with only one codebase.
Widgets are a major part of flutter. They’re not just for layouts. They can be used for anything. They were made to make the whole process easier and faster for developers, and some widgets are explicitly designed for Android or IOS.
So what are widgets exactly? You can see widgets like Lego blocks. If they’re separated, and you pile them up, they will look like a mess because you don’t know how to use them correctly. However, with the right knowledge, you can assemble them correctly to build something amazing. The best part of all is that once it’s done, you can deploy your code anywhere.
This means that you write code once, and you can deploy it anywhere that is supported by flutter, which means; one code base can get you IOS and Android and a web app.
Now, do you have an idea of ”what is flutter”? Anyway, let’s recap it for you with some technical jargon to make sure you got it.
So flutter is a framework/widget library that gives you reusable UI building blocks called widgets, just like the Legos. It is also a tool to build native cross-platform apps with one programming language and codebase.
That is the main benefit of flutter. Flutter also gives you software development kit tools to compile your code to native machine code. It uses Dart, an object-oriented programming language developed by Google.
So, to sum up, the most basic possible flutter definition would be a combination of an SDK and a framework created to make your life easier as a developer and make it faster to develop apps now. I hope you got a good understanding of flutter and the importance of it.
You can get more information from the official website of Flutter.
Follow the entire series, and by the end of this series, you will undoubtedly be a Flutter pro!

Python
File Handling in Python | Complete Guide to File Handling
Python supports file handling and allows several functionalities with files. The implementation of file handling in other languages is a bit complicated, whereas file handling in Python is very easy and simple. Each line of a file is terminated with a special character, called the EOL (End of Line characters), so that the interpreter knows that a new line has begun. To work with a file, the first step is to open the file.
Use of open() Function
We use open () function to open a file in Python. Two arguments, that accept file name and the mode in which the file should be opened, must be passed when calling the open function. Once the open function is called passing the correct arguments, it will return a file object. Files can be opened in four modes. For each mode, the following characters are assigned to pass as the arguments.
- “ r “– read mode
- “ w “– write mode
- “ a “– append mode
- “ r+ “- read and write mode
If no argument is passed as the mode, Python will consider it “ r ” by default. Note that, if you open a file in reading or append mode, the file name you entered must already exist. On the other hand, opening a file in write mode doesn’t require that condition. If you open a file in the write mode, with a file name that doesn’t exist, the program will create a new file by that name.
Read Mode in Python File Handling
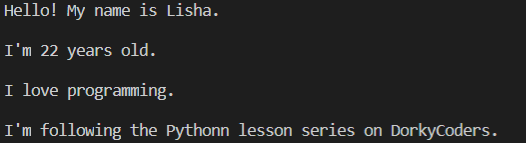
Let’s see what we can do with the read mode. First, create a text file and name it as myFile.txt. Then, type anything you want in that file and save it. Note that the output will differ according to what you’ve typed inside your .txt file. The code is given below consists of many read functions to output the data inside the file. Observe them and understand the functionalities of them.
Let’s open the file.
# open a file
my_file = open("test.txt","r")
Now try these read methods and check outputs.
print(my_file.readable()) # return True if file is readable
The output:

print(my_file.read()) # print entire file
The output:

print(my_file.readline()) # print first line
The output:

print(my_file.readlines()) # lines put into an array and printed
The output:

for i in my_file:
    print(i)
The output:
Write Mode in Python File Handling
The write mode is used to write something to a file. If you choose to write in a file that already has some context, the file will be overwritten. Let’s use the write function on the same text file we used before.
# open a file in write mode
my_file = open("test.txt","w")
# write
my_file.write("The file has new data.")
# close file
my_file.close()
If you go back to your test.txt file, you can see that the new content has overwritten the file. The close() method terminates all the resources in use, and it is good to close the file once you’ve finished working with it.
Append Mode in Python File Handling
Append mode is used when we want to add new content to the file. This doesn’t overwrite the file. It only appends new data.
# open a file in append mode
my_file = open("test.txt","a")
# write
my_file.write(" This is the append mode.")
# close file
my_file.close()
Once the code is executed, you can go back and see how the new content is added at the end of the file. These are the basics of file handling in Python. To dig a little deeper, you can look into many other functions associated with file handling in Python. One such function is the split() function. Below code spits each line into words separated by spaces.
# Use of split() function
my_file = open("test.txt","r")
data = my_file.readlines()
for line in data:
    words = line.split()
    print (words)
The output:

Now that you have an understanding of file handling in Python, go on and try different tasks improving the examples you studied here. Keep practicing until the next lesson!
Python
Functions in Python | Better Insight into Functions

When you’re working on a python program, you may find tasks that need to be done multiple times. It’s not a good practice to write the same block of code over and over again whenever you need that specific task to be done. As a solution to this situation, we use functions in python. The block of code for the task you need can be put inside a function. Whenever you call the function, you can get the expected result.
How to create functions in Python
To create a function, the keyword “def” is used along with the function name. Give any descriptive name as the function name, and whenever you want to call the function, that name should be used. Let’s create a function to print something.
# create a function

def print_something():
    print("This is a function")
Note that, when you run the above code, nothing gets printed on the terminal. The reason is that we’ve only created the function. To execute the function, we need to call it. Make sure to create a function before you call it.
How to call functions in Python
# create a function

def print_something():
    print("This is a function")

# call the function
print_something()
The output:

Arguments in Python
Sometimes we need to pass values to the function. This is needed when the code inside the function requires some value to work with. These values are called arguments. Inside the brackets after the function name, any number of arguments can be passed into the function, separated by a comma. The above example didn’t require any arguments. In the below example, first, we ask the user to input his name and age. Then, we create a function to output a description of the user.
# get user inputs
name = input("Enter your name: ")
age = input("Enter your age: ")

# create function
def user_description(username,userage):
    print(f"Hi, your name is {username} and you are {userage} years old.") # formatted string

# call the function
user_description(name,age)
The output:

Note that we’ve entered the name as “Mike” and the age as 25. When calling the function, the correct number and sequence of arguments should be used to get the expected results. Or else you can pass the arguments in the key = value form. In that method, the order of the arguments does not matter. Look at the below code on passing the arguments with key = value syntax.
user_description(userage=age,username=name)
Python gives us an option to use default values as arguments too. If no arguments are passed, the default values would be used.
# get user inputs
name = input("Enter your name: ")
age = input("Enter your age: ")

# create function
def user_description(username = "Jane",userage="20"):
    print(f"Hi, your name is {username} and you are {userage} years old.") # formatted string

# call the function
#user_description(name,age)
user_description()
The output:

As shown in the above example, since we haven’t passed arguments when calling the function, the default arguments are used. Therefore, even though we entered the name and the age as Tom and 28, respectively, those values are not printed.
Passing a List as an Argument in Python
You can pass any value belonging to any data type as an argument. The below example shows a situation where a list is passed as an argument.
# create function
def my_function(my_list):
    for x in my_list:
        print(x)

fruits = ["orange", "banana", "berry"]

# call the function
my_function(fruits)
The output:

Return Values from a Function in Python
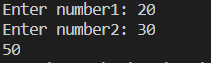
By using the return statement, you can return a value from a function. In the below example, first, the program asks for two numbers from the user. Then a function is created to return the sum of the two numbers. After calling the function, a message is printed for the user.
# get user inputs
number1 = input("Enter number1: ")
number2 = input("Enter number2: ")

# create function
def sum(num1,num2):
    return num1 + num2

# call the function
answer = sum(int(number1), int(number2))
print(answer)
The output:
We finished covering the basics of functions in Python. You can try out creating functions to do different tasks. And also, the returned value from the function can be used further in your program. Functions are there to make your coding life easy. Once you get a problem to solve, what you need to do is identify the tasks that you can create functions for. It will make it much easier to come up with a solution. By breaking the problem into creating several functions, you can improve the readability of your code as well.
I hope you got a good understanding of functions in Python. Practice more examples and get familiar with functions.
Python
Loops in Python | A Step by Step Guide

Welcome back, everyone! Hope you’re having fun with our Python lesson series. This lesson is all about loops in Python. Loops play a big role in programming, and you can do a lot with them. Loops are used to iterate through the same block of code over and over again. There are two main categories of loops. They are known as “for loops” and “while loops”. Both of them will be very useful for you in the future. Let’s begin with for loops.
For Loops in Python
A for loop is used for iterating over a sequence. Remember how we talked about lists in Python in a previous lesson? Well, iterating through a list and accessing the elements can be done by using a for-loop. You can use for-loops not only with lists but also with other sequences like tuple, dictionary, set, or a string. A for loop is used when we know how many times that it should iterate. Take a look at the below examples.
# Iterate through a list

#create a list
friends = ["Kevin","Ariana","Kyle","John","Tim"]

#for loop to print each friend
for friend in friends:
    print(friend)
The output:
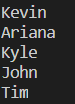
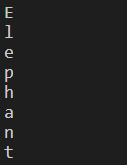
Pay attention to the syntax. After the keyword “for”, you are free to use any variable name. After the keyword “in”, the name of the list should be used. Then, in the end, a semicolon is used. Remember how we talked about indentation in the previous lesson? The lines of code which should be inside the scope of the for-loop must have an indentation. In the same manner, you can iterate through a string and access each character as well.
#Iterate through a string
for letter in "Elephant":
    print(letter)
The output:
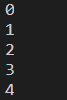
By using the range function, a range can be specified in a for loop.
#use of range function
for index in range(5):
    print(index) # 0 to 4 will be printed excluding 5
The output:
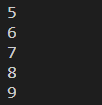
for index in range(5,10):
    print(index) # 5 to 9 will be printed excluding 10
The output:
for index in range(5,10,2):
    print(index)
The output:

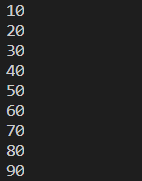
Just like we use a for loop to iterate through a list, we can use nested for loops to iterate through two-dimensional lists. A nested for loop is when you have a for loop inside another for loop. Look at the below example.
#create a 2D list
number_grid = [ [10,20,30], [40,50,60], [70,80,90]]

#nested for loop
for row in range(len(number_grid)):
    for column in range(len(number_grid[row])):
        print(number_grid[row][column])
The output:
While Loops in Python
Now that you have a basic understanding of loops let’s look into while loops. A while loop is executed as long as the given condition is true. It is mostly used when we are not certain about how many times it should be iterated. Look at the below code and understand the syntaxes and the functionality.
i = 1
while i <5:
    print(i)
    i = i + 1
The output:

In the above example, we have assigned the value 1 to the variable i. Then in the while condition, it is checked whether i is less than 5. Since it is true, the code inside the while block is executed. Likewise, it will print values from 1 to 4. Once 4 is printed, the value of i becomes 5. Then, the condition becomes false. Therefore, the while loop stops.
So up to now, we’ve finished covering the basics of loops in Python. Now, we’re going to explore some further concepts attached to loops. Those are break statements and continuous statements. The break statement can be used to stop the loop even if the while condition is true. Look how the above example is modified by adding a break statement. Because of it, only 1 & 2 will be printed as outputs (Once i becomes 3, the break statement executes).
i = 1
while i <5:
    if i==3:
        break
    print(i)
    i = i + 1
The output:

With the continue statement, we can stop the current iteration, and continue with the next.
i = 0
while i <5:
    i = i + 1
    if i==3:
        continue
    print(i)
The output:

Because of the continue statement, the program prints values from 1 to 5, excluding 3. These break statement and continue statements can be used with for loops as well with the same functionality. These points must be enough for a good insight into loops in Python.
So we hope that you got a good understanding of loops in Python. Keep practicing until the next lesson!

11 Best Golf Apps for Apple Watch

19 Best Free Video Editing Apps for Android

19 Best Free Photoshop Alternatives
-

 Tech5 years ago
How to Use Find My iPhone I The Easiest Way!
-

 Tech5 years ago
11 Best Battle Royale Games for Low End PC 2021
-

 Reviews5 years ago
Fastrack Reflex 3.0 Review 2024: Should You Buy?
-

 Python6 years ago
Python if Statements | Easy Explanation and Examples
-

 Tech5 years ago
15 Best Free Live Football Streaming Apps for Android & IOS
-

 Tech5 years ago
11 Best Free Scanner Apps for iPhone
-

 More6 years ago
Top 7 Reasons to Learn Java in 2024
-

 Tech5 years ago
Users Can Operate One WhatsApp Account on Various Devices, Multi-Device Feature Will Be Coming Shortly!